Spring

Spring

Tuesday, August 28, 2012

Fall

Good morning!!  We as promised I started decorating for Fall last weekend. 
So I strated with the top of our entertainment center. 
This is an overall shot...I started with adding pumpkins to the basket in a childhood wagon.
Then I added the inital pumpkin to the other end along with a burlap Fall banner I made last year...it's hanging on the basket in the middle.
 
Not a ton of Fall just a few touches....will be adding more this weekend...


Saturday, August 25, 2012

Inspiration & Before/After

Hope you are having a great Saturday.  I have been busy getting my Fall decorations out. 
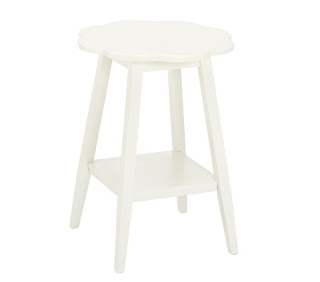
One of my favorite little tables was the first place I started so I thought what a better time to show you the before/after of this little table.  This is how it started....except it was pink!!!
It's Pottery Barn Kids Flower table...I got it from a friend years ago & thought I would use it in my daughter's bedroom..but never did.  So one day at work..(I'm an Interior Designer) we got this wonderful table it....and I fell in love with it but the $$$ was over my budget.
The wonderful designs are created from shell buttons.  So I thought...how easy would it be to re-create that same style with the flower table I already had.  First thing I did was paint it white and then I went to Jo Ann's and got the shell buttons and started gluing....and this is the after.
Since the table is so small I put the shell buttons around the edges and top.
It was super easy to do, only took a few hours and I love it!!  So even though it's not the exact same table it's close enough for me and a LOT less $$$$.


Thursday, August 23, 2012

Friday..For the Love of Tin

I'm sorry I am a week late on this post..I have been a bit under the weather!!  But I'm back now..this week I am featuring a couple of antique tins that I have framed.
These are the first tins I ever bought.  The one above was a lot more grey so I just painted it with some craft paint to make it the color I wanted.  I had my hubby mount it on a thin sheet of wood and then he made a frame around it for me. 
The one above...came the way to see it!!  So I just framed it out.  I love the simple style of this one...they hang together in my dining room. 
Along side a display cabinet that was my grandparents, a handmade chair that was my great grandmothers and my collection of white pitchers.  I just love the way this litte corner of my dining room looks...will have more on this room soon.


Tuesday, August 14, 2012

Simple Changes

Well as many of you know I am a full time Interior Designer..there for I am always trying to change things up with my accessories.  We built our home about 7 years ago and we have a few transom windows in our main areas....which I have tried to accessorize but I was never super happy with how it looked.  I first tried photos...too high up & you can't see the photos, then I decided to try iron work..so that is what has been in our family room transoms for awhile now.
As you can see it looks ok..but since I am rearranging things in my family room I thought I would change it up a bit.  (the wall on the left if the display wall in progress & new panels will replace the valance)  Just remember it's not complete yet...
I decided to paint and distress the iron work and hang them above the transom.
As you can see it toned it down a bit...they show up much better in person.  I like the new look with them being lighter they don't "scream" at you when you come in the room & it brings your eye up in the room.  Not sure what I will be putting in the transom but I am sure I will figure that out. If you have any ideas those are always welcome too.


Saturday, August 11, 2012

"Display" Wall..In Progress!!

I have been working on a large "display" wall for a bit now.  I have most of the items but I'm just trying to pull it all together to my liking!  It all started with a large wall in my family room..I already had a few things up but they just never really looked pulled together.  Once I saw this inspiration photo on Pinterest I knew this is what I had been "looking" for!!!
I love the overall look...and the colors but they are not right for my personal home.  So with that being said I will change up the colors of the frames but use off white also.  Tonight I will be showing you a sneak peak of what I have been working on for the wall & once I get it all together I will post an update.
So far this is one of my favorite things for the wall...I took an old frame and covered the insert with burlap to add texture & color and the letter C. (for our last name)
I hope to have it done tomorrow..if so I will be posting the final photos then. :) 


Thursday, August 9, 2012

For the Love of Tin

As I'm sure you have noticed I love ceiling tin....which leads to..different ways to display it.  Well I have many different ways to display them..so this week I am going to share my latest...

It all started with the tin above...I found a GREAT reproduction tin at a local flea market for $5!!!  The only problem was there was a large scratch accross the center so to cover it up I painted it and mounted it on a sheet of beadboard (another one of my favorite things!!)  Not only did it cover it up and create a nice "frame" and also made it fit in with my decor better.  Needless to say this is one of my favorite tins....along with this one.
This one is VERY old and I love the color and patina it has...I spent the most on this one it was $20..but so worth every penny!!! All I did was mount it on beadboard.  With these two tins I wanted to add "something" to them but not too much and beadboard fit the bill.  Next week I will show you anohter way to display tin.


Sunday, August 5, 2012

Tools to Flowers

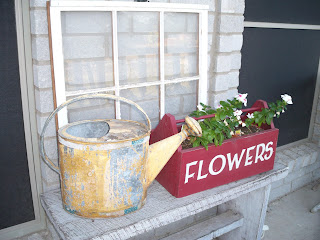
I found this neat wooden tool box at a local flea market..but I had great plans for it and it didn't involve tools at all!!!
First I lightly sanded & painted a base of Heirloom White..
Next I cut letters out using my Cricut...
Then, I painted it red and removed the letters...
I have it on a bench by our front door...Spring & Summer it has flowers but in the Fall it has pumpkins and in the Winter it has fake snowballs.  It was a very simple project and only cost $8 to create.


Friday, August 3, 2012

For the LOVE of Ceiling Tin

Yep it's one of my favorite things to decorate with!!!!  The more aged the better.  This week I am featuring the tin ceiling I installed in our daughters bathroom!!  I got a steal on 5 sheets of OLD ceiling tin and cut/mounted on a sheet of plywood and screwed  to ceiling.  The tin was VERY rusty on the back that is why I put it on the plywood and if I ever wanted to take it down it would be easy.
Here is the whole ceiling..it's in the vanity area.  Since I love the aged look I knocked off the really loose pieces of paint and sprayed clear sealer on the rest.  The look was exactly what I was going for.  And if I ever come accross more sheets at $5 each I will make another one!!!  Yep I got the tin for only $5 a sheet!!!  If you look hard enough you can find it for a great price!! 
Here is another view...yes I had to lay on the floor to get a photo of the whole ceiling.  So if you are on the hunt for old tin I would suggest antique stores, flea markets and Craig's List...happy hunting!!